How to use SourceTree
Goal: Be able to clone your project (to download it from GitLab), to edit it locally,and to save your changes to your local git repo and to the GitLab server.
In this exercise you will download your copy (including those changes) and you will continue to modify it.
You must finish the previous exercises first so that the changes you make at the end of those exercises will be downloaded in the this exercise.
You're expected to try and make progress even if the pictures aren't identical (just like you'll be expected to first try and fix your own problem when working in industry). As always, if you get stuck please seek help from the instructor.
(If the images below are wildly different from what you're seeing please contact the instructor - it may be that something big has changed since this tutorial was created)
What you need
In order to do this exercise you must have already done:
all of which was covered in the prior tutorials.
What you'll do in this tutorial
There's several steps to working on your git repo on your local (personal) computer:
Installing SourceTree
In this course I recommend that you use a program named "SourceTree", made by a company called "Atlassian". The Atlassian SourceTree program is nice because it has a graphical user interface (it has windows, menu bars, etc), it's available for Windows and MacOS, and it's free. That said, you're free to use any other git client you want as long as you're comfortable trouble-shooting your problems independently you're free to use whatever 'git' client you want.
The first step is to download (and install) the program. You can do this at https://www.sourcetreeapp.com. Once you've installed the program start it up.
What does this mean for you? During the instalation process SourceTree may ask you if you'd like to install some git software. You should say 'Yes' and install that git software so that SourceTree can use it. If SourceTree offers to install anything else (for example, the PuTTY-Keygen program, which Windows users can use to generate keys for the SSH protocol) you should also install those programs as well.
Cloning (copying) the project (repo) from GitLab to your computer
When you first start SourceTree it will probably look something like this:
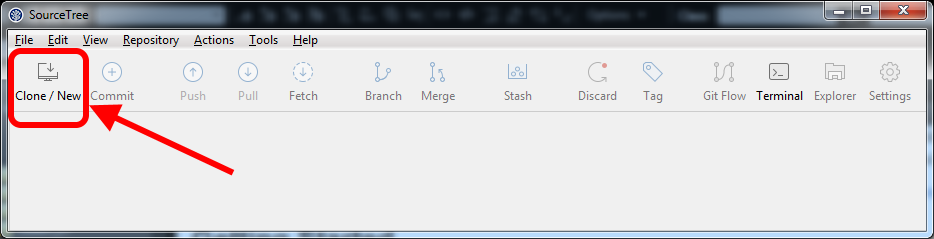
At this point just about the only thing you can do is to click on the button labeled 'Clone / New'. This will allow us to copy a project from the GitLab server down to your local computer (where you can then open the project in Visual Studio, edit it, compile and run it, etc)
When you click on that button you'll see a dialog box appear inside the SourceTree window:
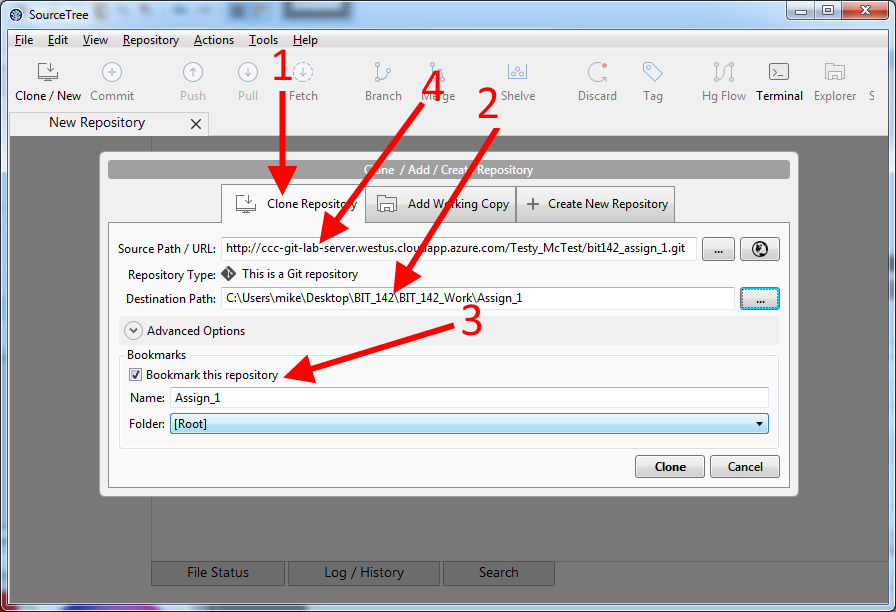
First, make sure that you're looking at the right tab - make sure that you're looking at the 'Clone Repository' tab pointed to by the '1' in the above picture.
You need to fill in the 'Source Path / URL' box and the 'Destination Path' box.
The 'Destination Path' box is the easier one - it's a path to a folder on your local hard drive where the project should be cloned to (copied to). If you click on the button with the "..." in it (to the right of the textbox that the '2' points to) then it will open up a normal 'File Open' dialog and you can find a good folder through there.
By default SourceTree will put your new project/repo into a list of bookmarks, in order to make it easier to find later (this is the '3' arrow). This seems harmless and can be useful, so leave it checked off.
The 'Source Path / URL' box is slightly trickier (next to arrow '4') - you need to go back to the GitLab web page for the project you wish to clone and copy something from there.
Open up a browser window, and navigate back to the GitLab web page for the project. It should look something like this:
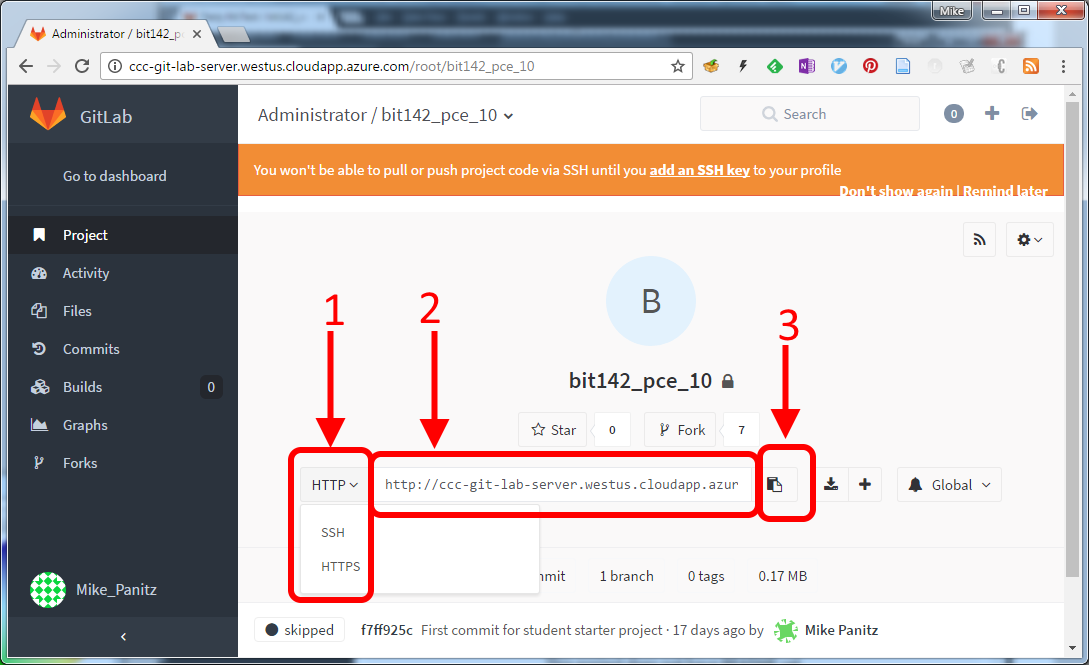
The first thing you need to do is to pick 'https' option from the drop-down list pointed to by the '1'.
The second thing you need to do is to copy the blob of text pointed to by the '2' (in the above picture it starts with 'http://ccc-git-lab-server...'). This is the Source URL that we need.
If you want to you can click on the icon pointed to by the '3', which will copy the source URL for you.
Once you've gotten that information paste it into the 'Source Path / URL' box in the previous picture, then click the 'Clone' button.
NOTE: SourceTree will ask for your GitLab username and password. Your username is listed in the bottom corner of the web page (in the above image the username is "Testy_McTest".
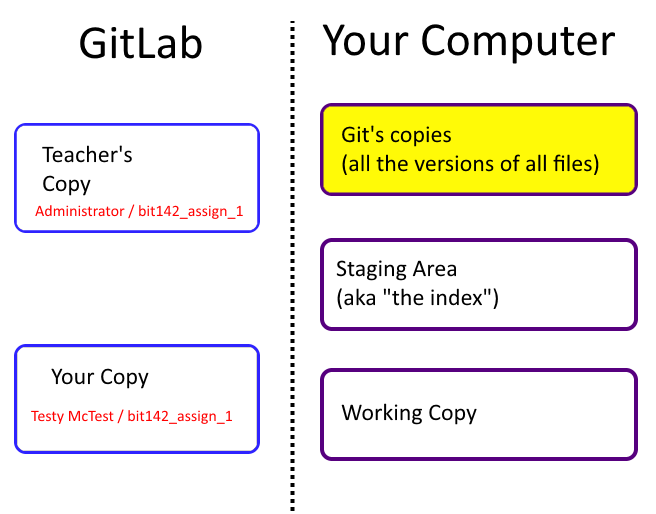
You then forked a second copy, on the GitLab server. This was your own, personal copy, and you can change it.
At this point you've now cloned a third copy onto your local computer. This is good because you can compile and run it on your computer (which you can't do on the server, even on your own copy).
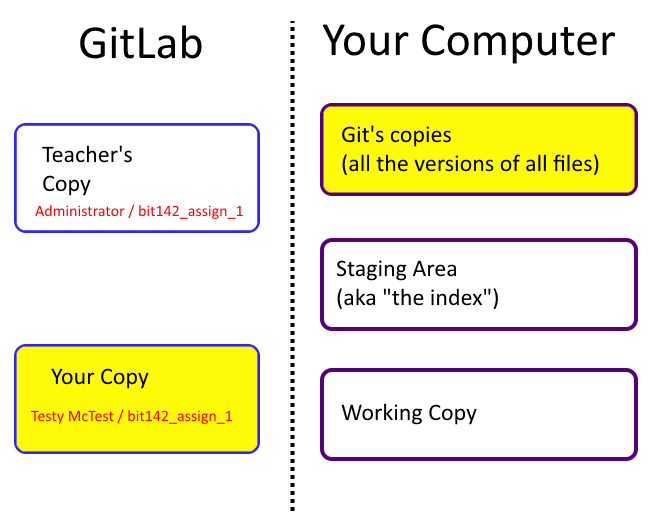
It can be confusing to have three separate copies of the same project; it's good to periodically stop and think about which version you're currently workinog on in order to avoid that confusion.
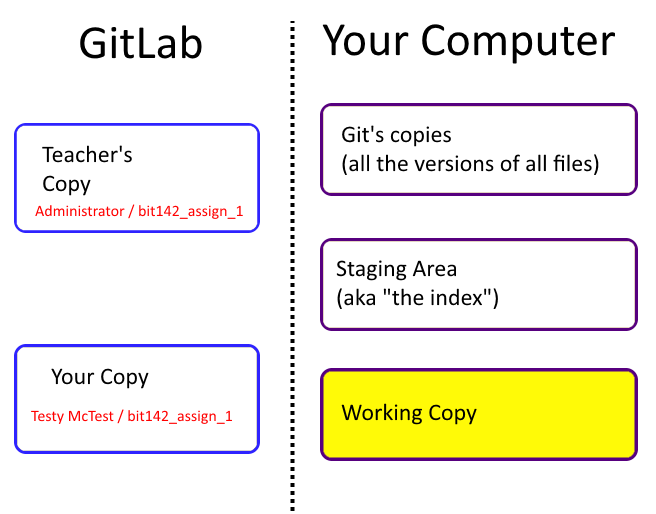
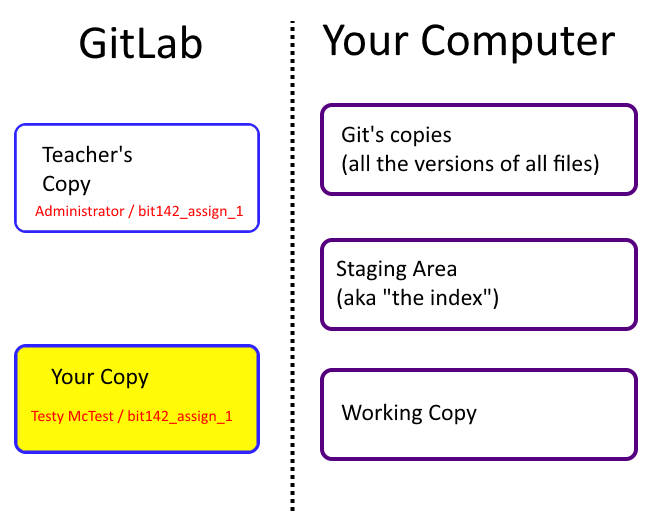
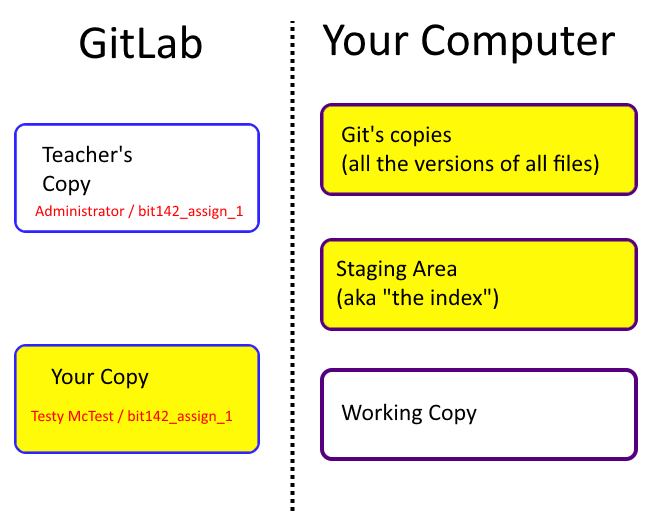
It may help to think of the copies like this:
- The Administrator's copy (the teacher's copy) exists only so you can copy it. You can't change this, so don't try to do work here.
- Since you're allowed to change this copy this is where you'll
put your work, once you're ready for it to be graded.
The teacher can see your copy on GitLab; the teacher will grade your work by examining what you've uploaded to GitLab. - The copy you have on your computer is the copy that you actually work on using Visual Studio.
At this point SourceTree will look something like the following:
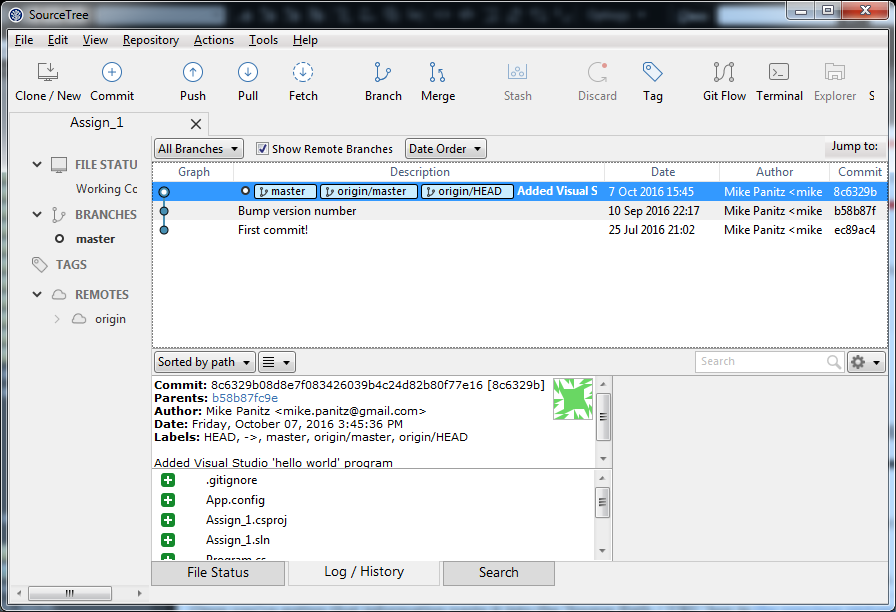
This tells you that SourceTree was able to succesfully clone (copy) the repo (project) from the GitLab server to your local computer. It's good to explore the program a bit, and see what information it tells you (and to remember anything that seems particularly useful).
The next step is to make a change to the project itself. You can do that by opening up the Visual Studio project in Visual Studio (and/or Windows Explorer) yourself. If you forget where you put it you can find it again by clicking on the 'Working Copy' button in the left hand column (next to the '1' in the below picture), and then then on the 'Open In Explorer' button (next to the '2'), as pictured below:
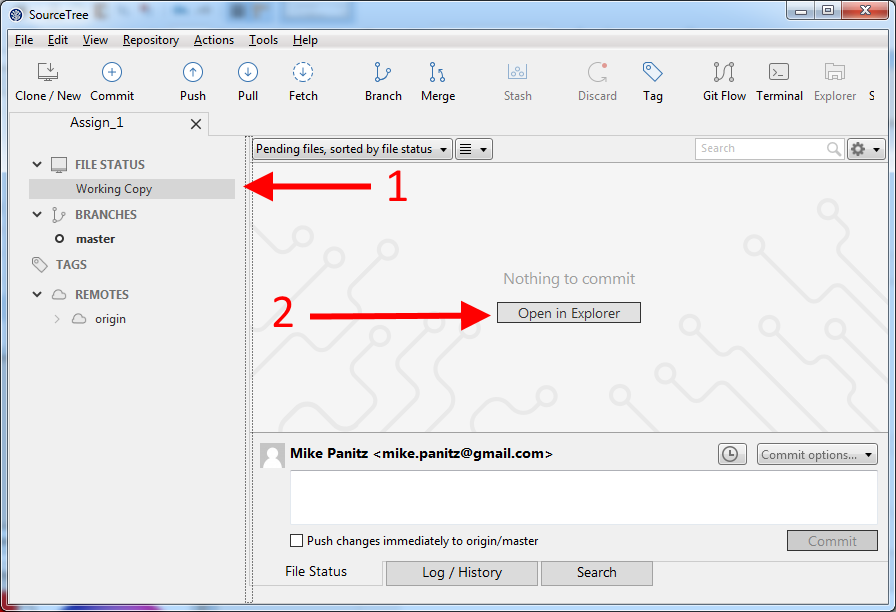
This will open up the folder in your normal file browser; from there you can copy the path to the folder.
Change the project using Visual Studio
Let's say that we've opened the project in Visual Studio (and then opened the Program.cs file) and we're looking at a program like this:
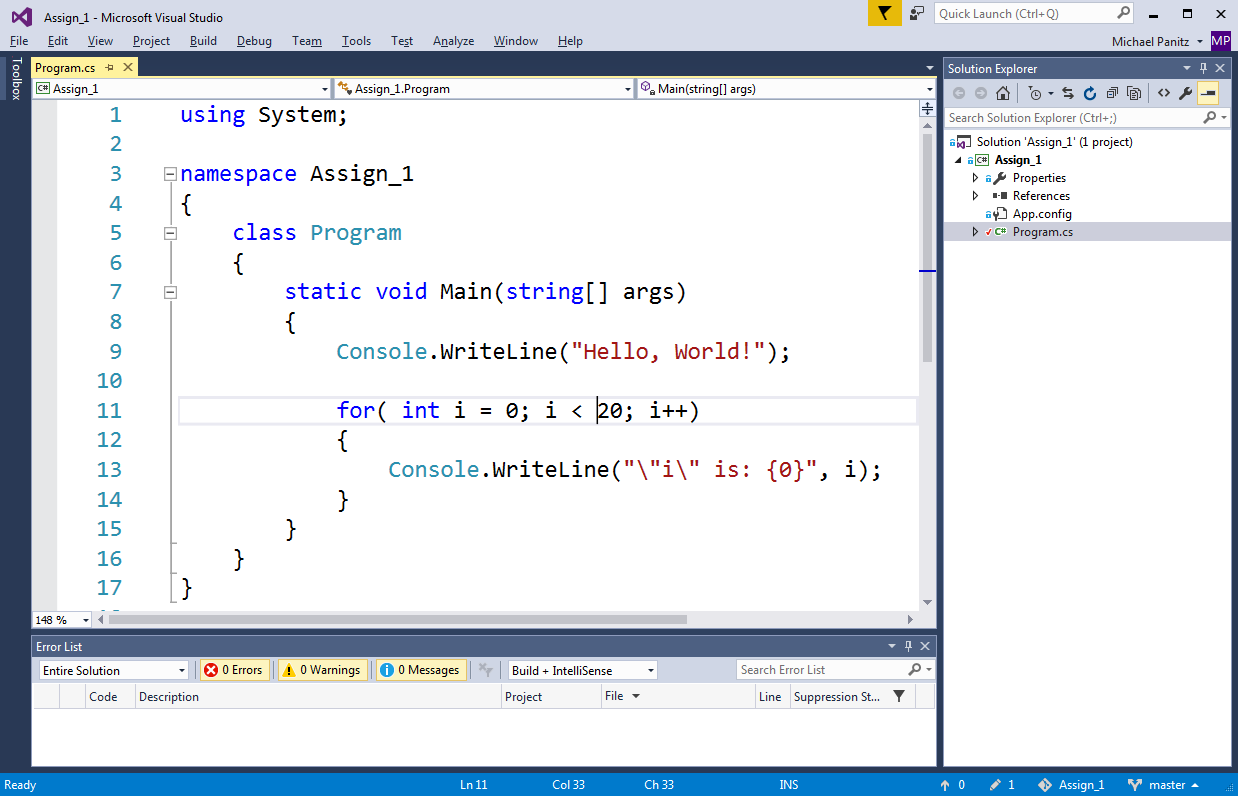
Imagine that we change the program so that it looks like this:

At this point we're happy with this change and so we want to store it back onto the GitLab server so that the teacher can grade it. We can do this via two steps:
- committing our changes to our local repo on our personal computer's hard drive, then
- pushing the changes back up to the GitLab server
Commit your change(s) to your local git repo using SourceTree and then push it back to the GitLab server
We can commit our changes to the local git repo by using SourceTree. You should leave Visual Studio (making sure to save all your files first!) and go back to SourceTree.
In this example, you would see the following:
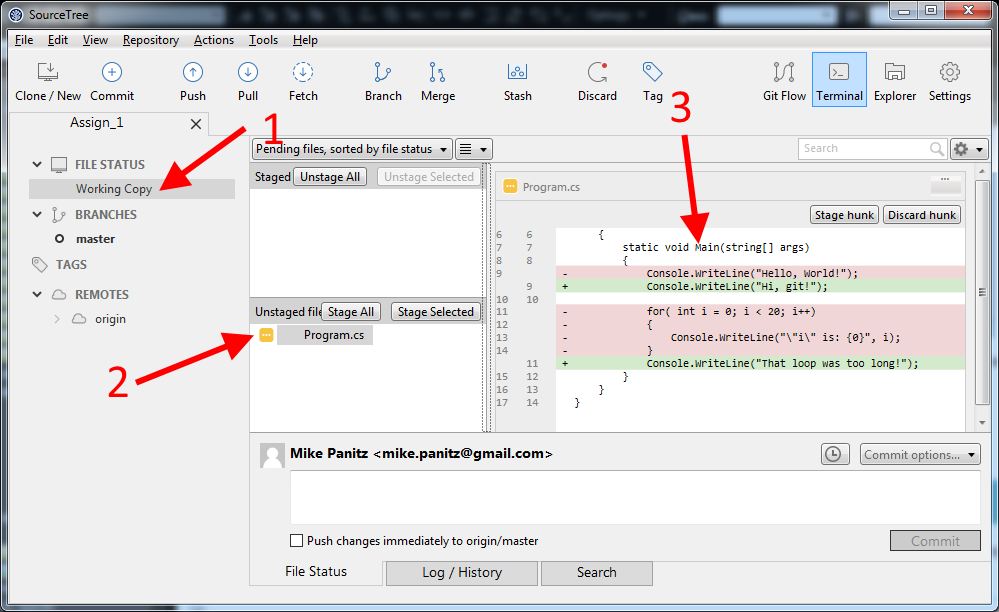
In order to see something similar to the above you first need to click on the words "Working Copy" (in the left-hand column, next to the '1'). The 'Working Copy' is more-or-less your folder that contains all your work (as opposed to other stuff that git stores, such as the history of prior versions of files).
In the middle of the window is a panel labeled 'Unstaged files' (next to the '2'). Since the only file we changed was Program.cs that's the only file that's listed here. If you click on it you'll see the contents of the file appear on the right (below the '3').
If you examine the file in the above picture you'll notice that it's actually trying to show you how the file has been changed. Lines that are highlighted in green and have a minus sign at left edge are lines that have been removed. Lines highlighted in green with an addition sign (a plus sign) at the left are new lines. When we change a line it's represented as the old line being deleted and the modified line being added. You can see this on line 9, where we changed it from
Console.WriteLine("Hello, World!");to
Console.WriteLine("Hi, git!");In order to commit (save) our changes we must first tell git which changes we want to save (commit). We do this in the SourceTree program by either clicking 'Stage All' (if we want to save all of our files) or by selecting individual files and then clicking on 'Stage Selected' (both buttons are near arrow '1' in the below picture).
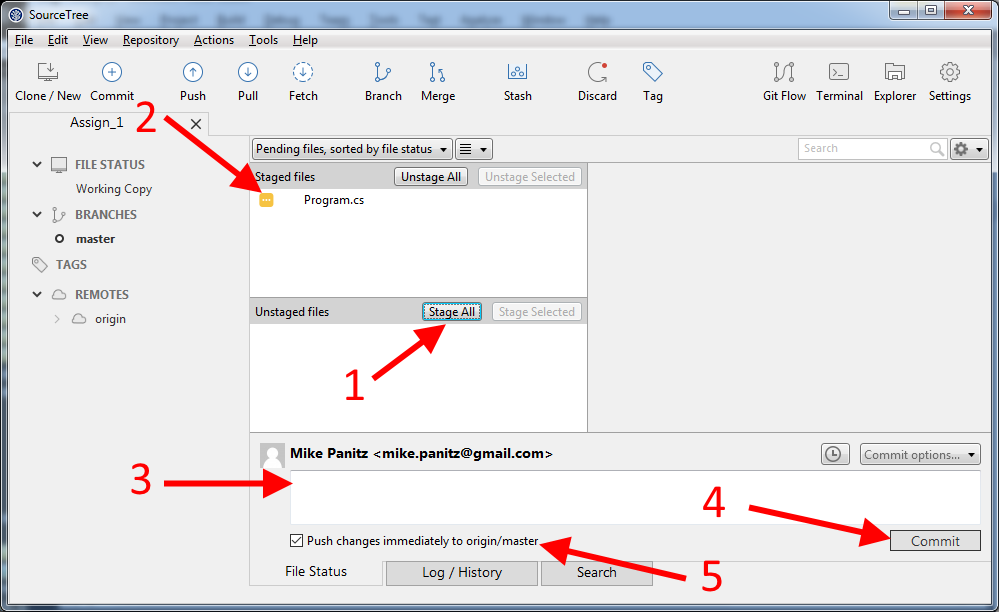
You'll notice that the Program.cs file moved from the 'Unstaged files'
list to the 'Staged files' list near the '2' arrow. A 'Staged file' is
a file that git will save (commit), once we tell it to do so. By
allowing us to separately stage, and then commit (save) our files we could
very carefully commit only a couple of our files if we wanted to. (In
this class it's recommended that you stage all your files so you don't
accidentally leave anything out).
You can click on the 'Program.cs' file
in the 'Staged files' list and again see the file (with changed
highlighted).
Just like with GitLab you must write a commit message before you're allowed to commit you change. You can do that by filling in the box that '3' points to. Once you've written a Commit Message the Commit button will be activated (near the '4' arrow).
You'll notice that the '5' arrow is pointing to a checkbox labeled 'Push changed immediatly to origin/master' In this case 'origin/master' is another name for the GitLab server that we cloned the project from. Make sure that it's checked and it will not only save your changes to your local git repo but it will also push the changes back to the GitLab server (where your teacher can see it and grade it).
Confirm that the changes are on the server
In order to confirm that your changes really did make it back to the server you should go back to the GitLab web site, then find the main page for your project/repo, then click on the 'Files' link in the left-hand column, in order to see something like this:

In order to confirm that the commit was successfully pushed back to the server we'll look at the contents of the file itself.
However, before we look at the file contents we can already see two clues that the commit worked. First, you'll notice that the second column in the files table lists the 'Last Update', and that Program.cs was updated recently (this is above the '1' arrow)(the reason why it says 'about an hour ago' is because I took a break from writing this and did some other work for about an hour). Second, you can see the Commit Message in the last column (above the '2' arrow).
However, there's nothing quite as reassuring as seeing the newly updated contents of the file itself. Click on the word 'Program.cs' and you'll see something like this:
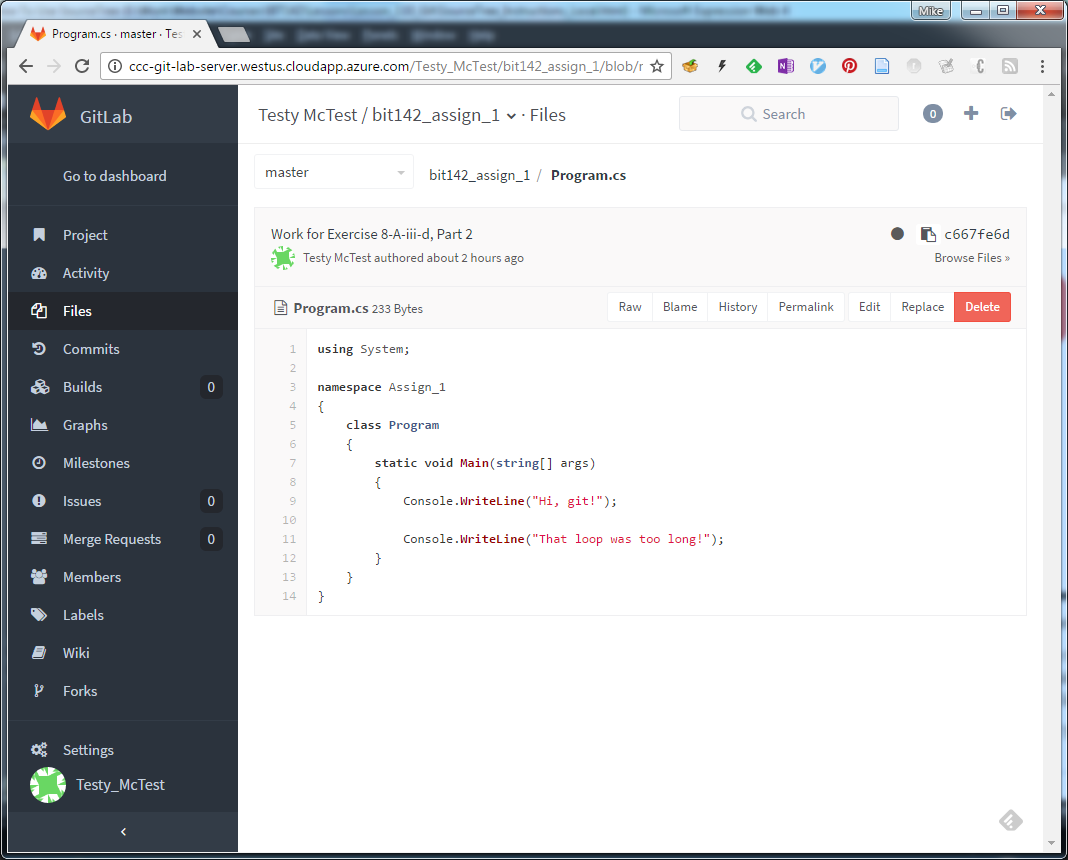
This does look like the changed file that saved so we know that we were able to save our changes successfully.
What to do if the changes AREN'T on the server
If you looked on GitLab and didn't find your changes then you should start by retracing your steps. Make sure that you made the changes in Visual Studio, and make sure that you saved them. If the changes were made and saved then the next step is to see what SourceTree says about the project. The file is listed in the Unstaged files list then you should stage it and commit/push it. If it's listed in the Staged files list then commit/push them.
However, it's possible that you've saved the files, staged them, and committed them to you local copy of the git project/repo on your own machine WITHOUT pushing them up to the server. In that case you'll see the changed files in Visual Studio but both the Staged file and Unstaged files lists will be empty. In SourceTree you'll notice that there's a little 1<up arrow> icon next to the word master (still above the '1' arrow) which tells us that there's a commit that we saved locally (on our hard drive) but did not push back to the server. If you examine the 'Push' button in the ribbon at the top (above the '2' arrow) you'll notice that there's a tiny number 1 there as well.
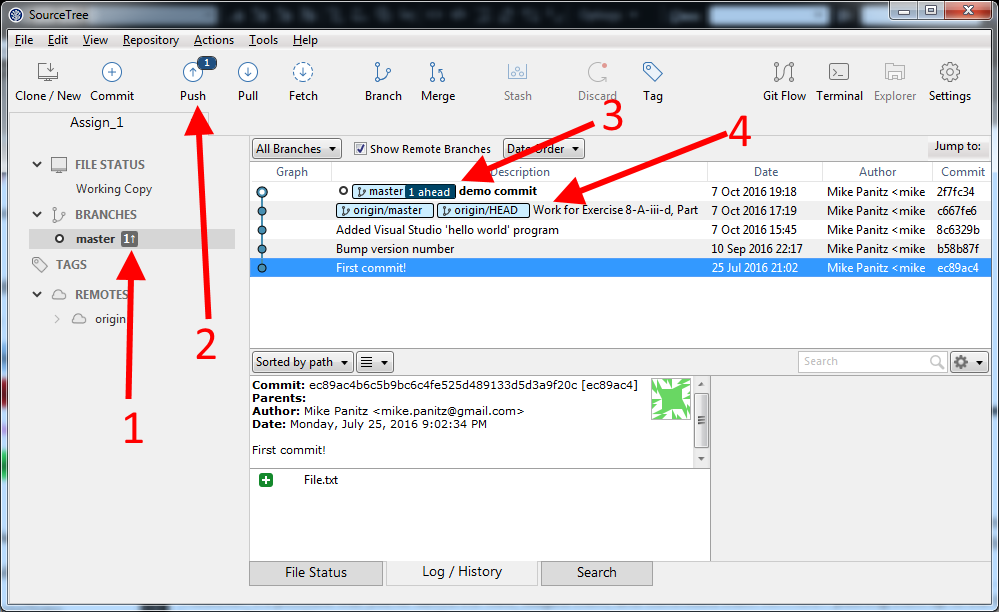
When we click on the 'master' branch (above the '1' arrow), under BRANCHES in the left-hand column of the picture below you should see something like the above picture. The thing that most clearly confirms our problem is pointed to by arrow 3. The 'master' branch is labeled as being "1 ahead". When looking at this table you can see that the most recent commit is at the top and the commits get older as you go down the table. Clearly, the most recent commit was our commit (which we can see from the Commit Message - in this case I chose the uniformative message "demo commit"). When git (and SourceTree) uses the word 'master' they mean the master branch stored locally on our computer. Whenever you see the word 'origin' git/SourceTree is talking about the GitLab server (because that's where we cloned our project from). So when SourceTree tells us that the "origin/master" (and the "origin/HEAD") branches are at the prior commit (the one with the Commit Message "Work for Exercise 8-A-iii-d, Part 2") and the "master" branch is at the most recent commit what it's really telling us is that we haven't pushed the most recent commit to GitLab.
Once you've confirmed that that's the problem you should be able to easily fix this by pushig the Push button in the ribbon (above the '2' arrow, in the above picture). Once you do that you'll see this dialog:
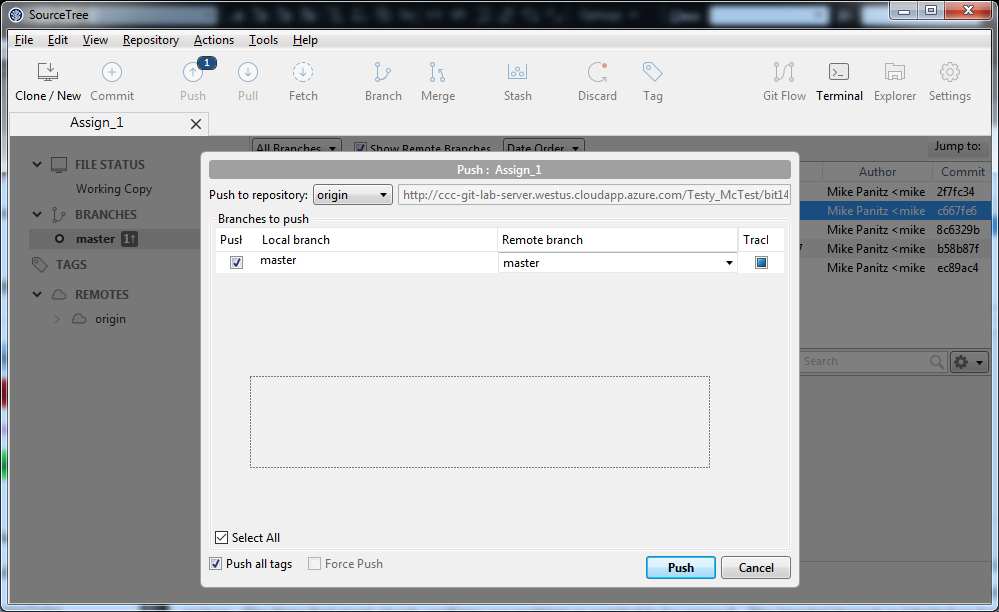
These defaults are all reasonable and so you can just click the 'Push' button.
(Notice that at the top SourceTree asks you which repository to push to (where is says "Push to repository:"), it then suggests 'origin' and lists the URL for the GitLab server that we're using. This is another example of the fact that git/SourceTree mean 'our GitLab server' when they say 'origin)
The 'master' branch now looks like this in SourceTree:
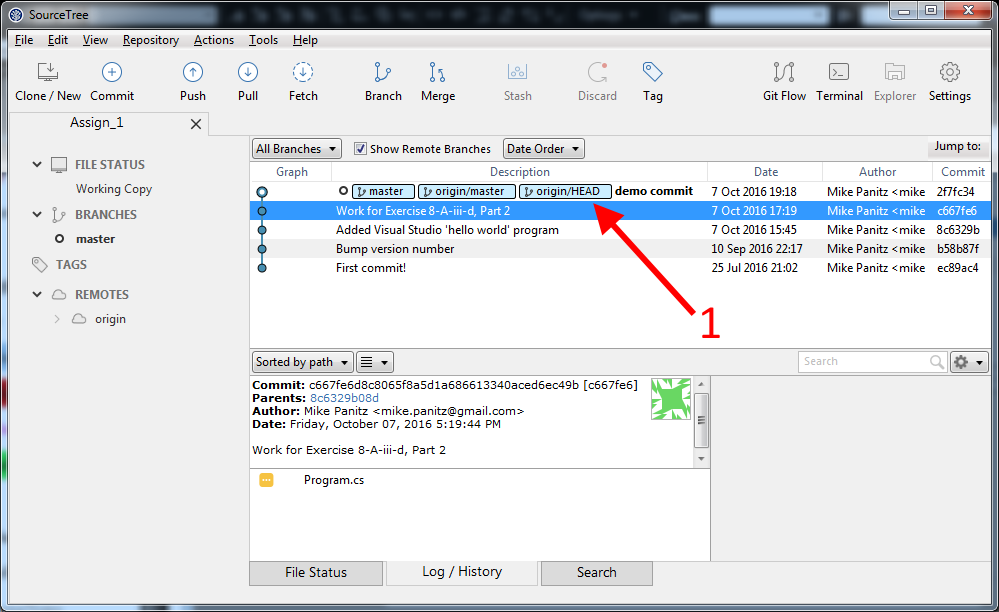
You'll notice that now 'master', 'origin/master', and 'origin/HEAD' are all on the same commit (above the '1' arrow). You should be able to go back and confirm that the commit is on the server now.
If you saw an error message at any point during this process you should go back, get the error to happen again (if you can), and then copy that error message into Google/Bing and see if anyone else has fixed that problem.
If that doesn't work then post a question to an appropriate discussion forum on Canvas and/or email your instructor for help.
Getting your grades from GitLab
At this point the plan is that the instructor will grade your work by cloning your GitLab repo to their local computer, grading the work you did, writing feedback into a file, committing that file to their local repo, and then pushing that new file back to your repository. (You might notice that in this plan the teacher skips forking your repo - the teacher can do this because the teacher is the GitLab Administrator, and the Administrator account is allowed to access everyones' projects)
If you want to view your feedback you'll need to wait until the teacher has finished grading your work (at which point the instructor notify the class). You can then view the file on GitLab (this might not work for files like Word .DOC/.DOCX files or .PDFs), you can download a copy of all the files (using the "Download zip" button in the top-right corner of the project's file list, or you can download the changes to your local git repo by opening up SourceTree and clicking on the 'Pull' button (NOT the 'Fetch' button), agreeing to the reasonable defaults, and clicking 'OK'.