What to do
if you change both
your local repo and the copy in GitLab
This example doesn't work because GitKraken will pull, then push, thus fast-foward auto-merging non-conflicting changes
Goal: In this exercise you will familiarize yourself with the process of adding a new file to your local repo, using GitKraken.
In this exercise you will download your copy (including those changes) and you will continue to modify it.
You must finish the previous exercises first so that the changes you make at the end of those exercises will be downloaded in the this exercise.
The problem
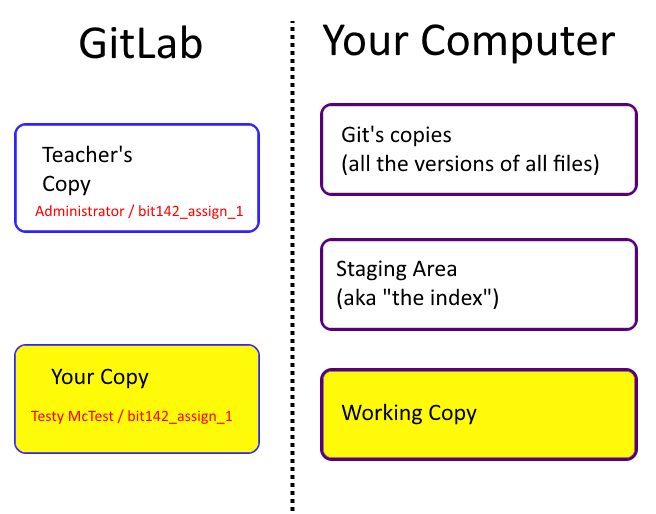
Let's say that you've downloaded a copy of the repo onto your computer (aka "cloned the repo to your local machine"). On your local computer you've made some changes to the repo - maybe you've modified a file(s), maybe you've added a file(s), or perhaps you've removed a file(s). Then, you made a change to the copy of the repo that's stored in GitLab. Maybe you added a file (like the Viewing Quiz), or fixed (modified) a file. When you attempt to commit your changes on the local machine things will go fine, but when you attempt to push your changes back to the GitLab server you'll get an error.
The fix (tl;dr version)
If you download the repo and make changes to it, then make different changes to the copy on the GitLab server, you will need to first pull the changes from the GitLab server to your local computer and merge the GitLab changes into your local copy THEN push that merged copy back to the GitLab server.
Walking through this in detail
Let's get this problem to happen for ourselves, so that we can examine it first hand.
First, make sure that you've downloaded the most recent copy of the GitLab repo onto your local computer. Once you've done that then you can make one change to the GitLab copy and another change to your local copy. In order to avoid any chance of a merge conflict we're going to change both copies by adding a brand-new file to each one.
Make a change to the GitLab copy of the repo
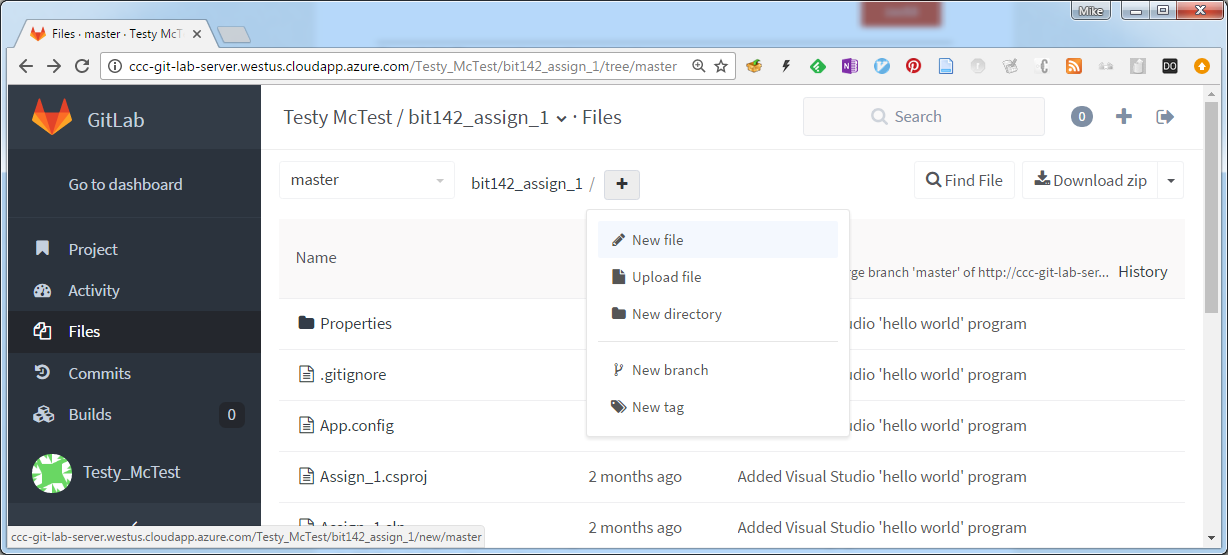
Log in to the GitLab server, open one of your repos, and click on the Files link in the left-hand column. At this point you can either upload a new file to the server, or else click on the Plus sign and select the New File option in order to create a new file, as pictured here:
In our example we're going to create a file named ADDED_TO_GITLAB.txt (do this by typing the name into the box next to the (1), below), and then type something into the file to remind ourselves that we created this on the server (this is the box with the (2), below):
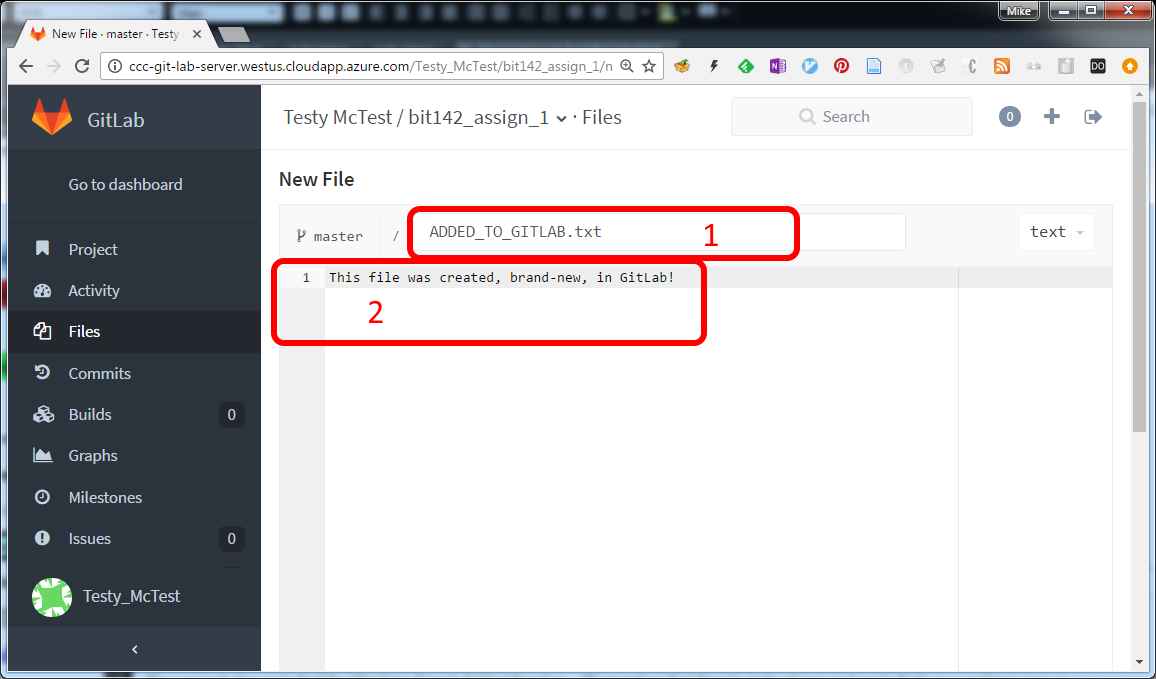
Type in a useful commit message (we'll use "ADDED_TO_GITLAB.txt was added here on GitLab", not pictured above) and the click the commit button
Make a change to our local copy of the repo, via GitKraken
Start GitKraken, then open up the Working Copy of your project. Create a text file in the repo directory however you wish. You may want to create the new file in Visual Studio. Another way to do this in Windows is to right-click on the folder, select New (next to the (1), below) and then Text File (next to the (2), below), as pictured here:
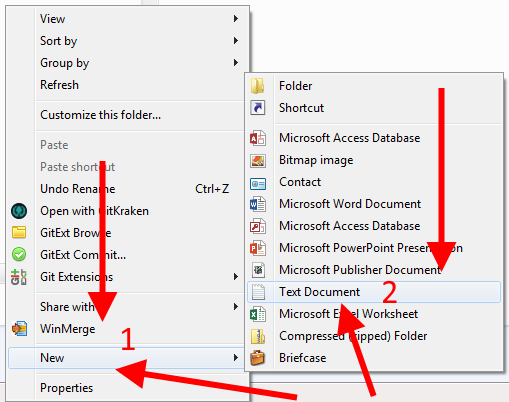
Name the file ADDED_TO_GitKraken.txt, open it, and type some text into the file that will remind us that we created the file here on our local computer.
Next, stage the file, type in a helpful commit message (such as "Added a file to git, via GitKraken"), and commit the change, as pictured here:
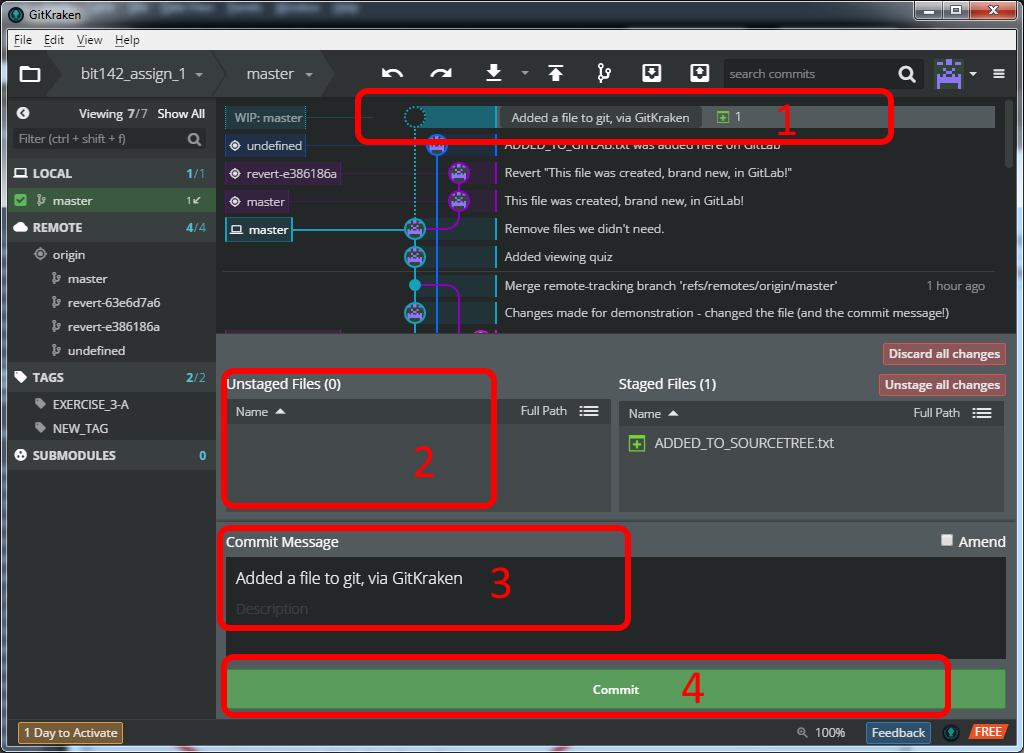
At this point you should click on the Push button, at which point GitKraken will notice that changes have been made to both the GitLab copy and your local copy, and provide you with the following message:

Do NOT click on the Force Push option - it will overwrite (replace) your changes on the server, losing those changes. This is not what you want, so do not do click on that button!
Try pushing the green Pull (fast-forward if possible) button to see what happens.
Interestingly, the error message is that GitKraken couldn't push the change back to the server. This is important: The local commit worked just fine, but GitKraken couldn't push the change back to GitLab.
Let's look at that error message in more detail:
	git -c diff.mnemonicprefix=false -c core.quotepath=false push -v --tags
	origin master:master
Pushing to
	http://ccc-git-lab-server.westus.cloudapp.azure.com/Testy_McTest/bit142_assign_1.git

	To
	http://ccc-git-lab-server.westus.cloudapp.azure.com/Testy_McTest/bit142_assign_1.git

	! [rejected] master -> master (fetch first)

error: failed to push
	some refs to
	'http://ccc-git-lab-server.westus.cloudapp.azure.com/Testy_McTest/bit142_assign_1.git'

	hint: Updates were rejected because the remote contains work that you do

	hint: not have locally. This is usually caused by another repository pushing

	hint: to the same ref. You may want to first integrate the remote changes

	hint: (e.g., 'git pull ...') before pushing again.
hint: See the 'Note
	about fast-forwards' in 'git push --help' for details.


	Completed with errors, see above.
Understanding the error
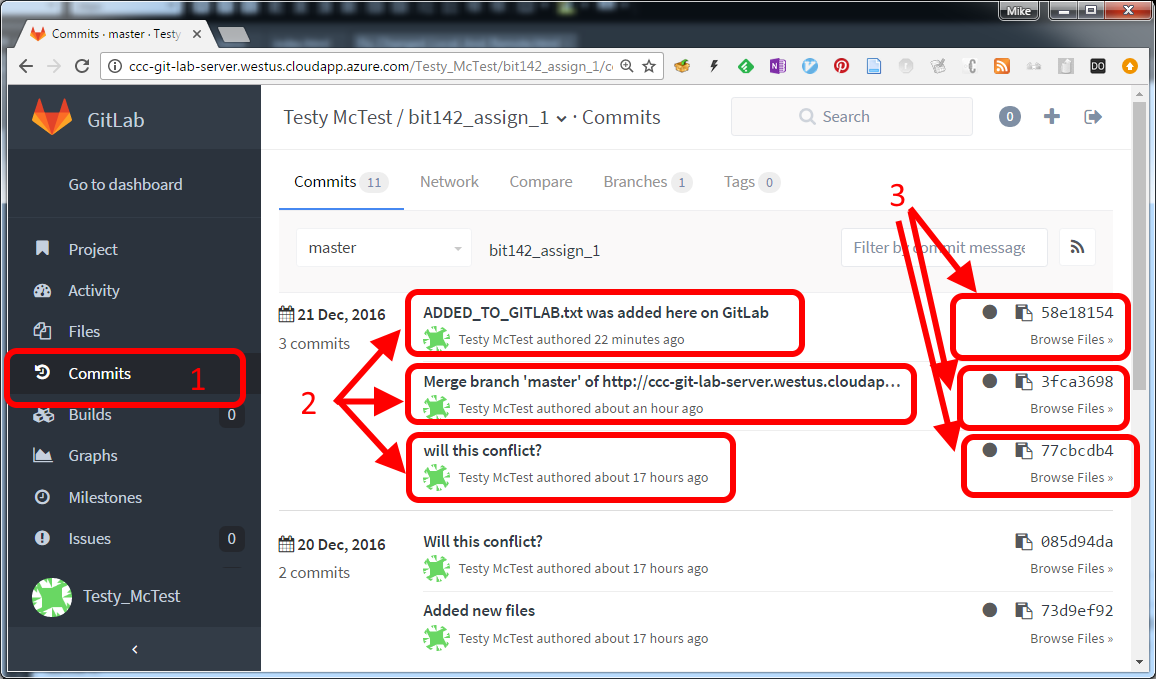
After we added the file to the server the 'history' (the list of changes
- really, the list of commits) looked something like the following:
(You
can find this page by clicking 'Commit' in the left hand column (by the (1),
below). The commit message for each commit is listed in the boxes that
the '2' points to, and the corresponding ID number (the SHA-1 hash
number) for each commit is listed in the boxes that the '3' points
to.
There's a lot of detail in the above picture. For this discussion all we really care about is this:

Note that the oldest commit is on the left, and the one where we added
the file to GitLab is on the right.
Also note that each commit (each change that we saved) has a unique
number assigned to it. These SHA-1 hashes are visible in the picture.
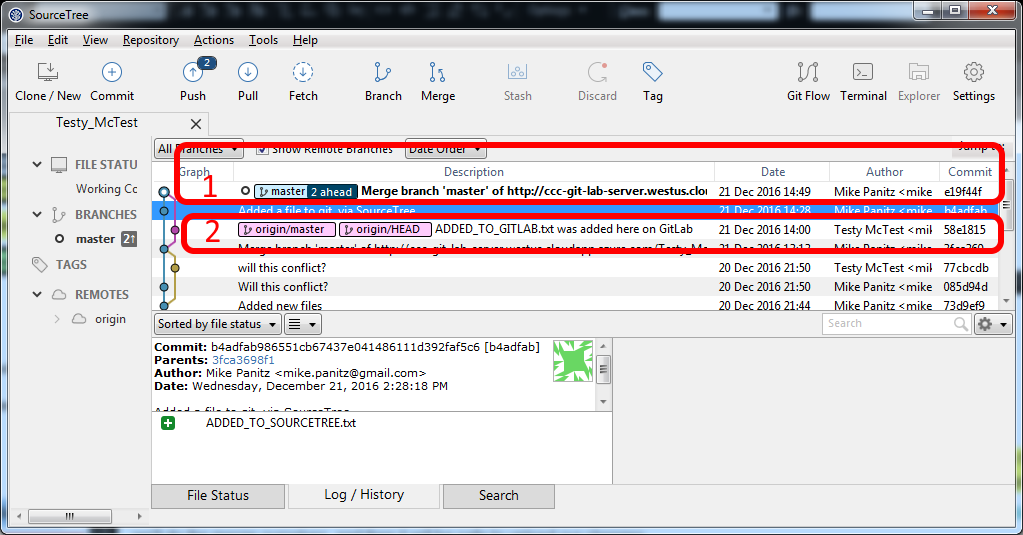
After we added the different file to our local git repo, here's how our local version of the history looked in GitKraken. Just like with the prior image, we should click on the word 'master' (in box (1) ), then we'll see the commit messages in box (2), and we'll see the SHA-1 ID numbers in box 3.

You'll notice that GitKraken lists the commit that we made in GitLab in the above picture - we can see the commit message "ADDED_TO_GITLAB.txt was added here on GitLab" in the above picture. The commits that are stored locally are listed along the left edge of the screen, while the new GitLab commit is off to the side and, notably, does NOT have a line connecting it to our most recent checkin. What's happening is that GitKraken has talked to GitLab, noticed that we've made that commit, and is trying to tell us that the commit exists on the server but NOT in our local repo
Much like with GitLab there's a lot of detail in the above image that's not relevant to our current discussion. The essential history that GitKraken is showing us is:

If you go back and look at the two histories side by side you'll notice that the left two commits have the same commit message AND the same SHA-1 ID number. This is because the two repos actually do have the extact same history (until the most recent commit). Let's see that here, in a single picture:
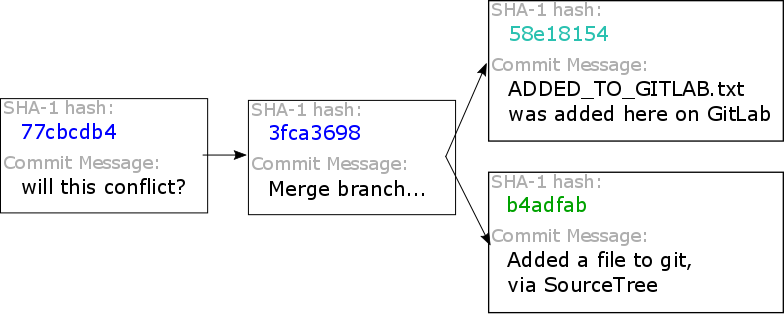
Unfortunately, GitLab can't merge these two changes for us. This fact is the key to understanding what's going on here. Even though here, in this one specific situation we happen to know that are two changes are different, unrelated changes git is not able to merge these two changes together for us.
What we'll have to do instead is to download the changes from the server (specifically, we'll pull the commit with the ID number of 58e18154 to our local comptuer), we'll do the merge ourselves, and then it will be safe to upload our changes.
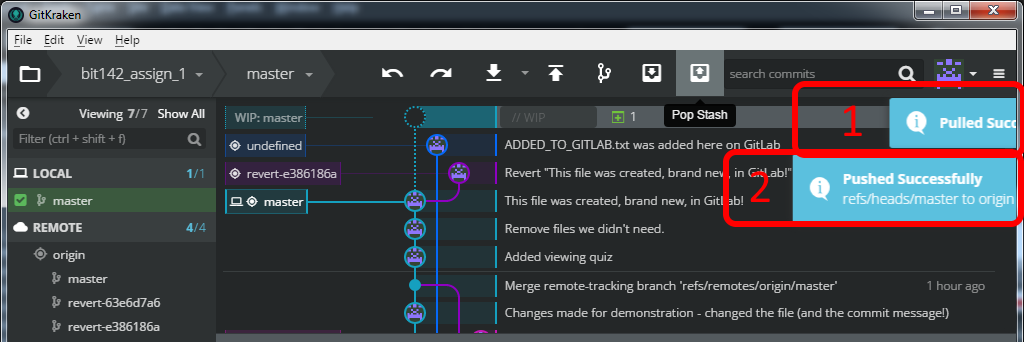
Do this by clicking on the 'pull' button, agreeing to the defaults (including, most importantly, the 'commit immediately' checkbox), and then you should see something like the following:
You'll see (next to the (1) ) a new commit that joins the left-most vertical line representing our local commits (changes) with the pink line that goes through the commit with the message 'ADDED_TO_GITLAB.txt. was..". This represents a new change to our local repo that can be thought of like this:
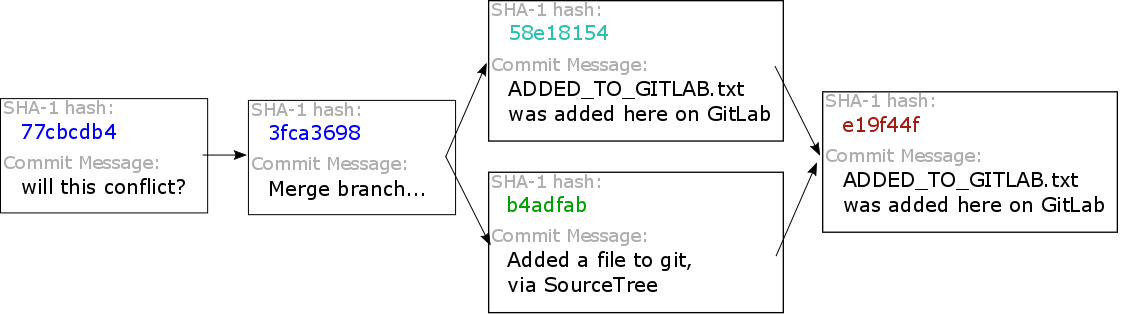
At this point it's safe to push (upload) our repo to the GitLab server because GitLab will see that it's most recent commit ( 58e18154 ) can follow a chain of arrows to our most recent commit ( e19f44f ). This is what's known as a 'fast forward merge', and because it is always safe to do, GitLab is willing to do it.
In this example we were very, very careful to introduce different changes to the two copies of the repo. Because of this it was trivial to merge the two repos together - since we added a new file to each repo, there was no way that a change we'd made in each one could have contradicted a change made in the other. If we did make a contradictory change in each repo (for example, we opened up the same file in each, and changed the first line to contain one message in GitLab, and a different message in GitKraken) then this would be called a merge conflict and we would have had to resolve the conflict before we uploaded our changes to the server.
We're not going to cover merge conflicts in this tutorial; you're welcome to search the web to find out more, if you're interested. The Pro Git book has a good chapter on branching, including merges and merge conflicts.
Confirm that the changes are on the server
At this point you should log into the GitLab web site/web app, click on the name of the repo that you just pushed, then click on the Commits tab in the left-hand column. You should see the commit that we just pushed in the list, in the main panel.
If you don't see the commit, then you should use the same sort of
trouble-shooting procedures that were listed in the prior tutorials.
(Note: I'm specifically mentioning this to remind you about this, but
specifically not linking to it in order to get you to go look it up
independently if you need to. Regardless, you should work to develop
your troubleshooting skills so that you can use them independently.)