Note: Please keep the programs that you create today, in case you have a question about your grades for the ICEs at the end of the quarter. When you're working with a partner, each person should save their own, individual copy.
 Part 0: Getting a decent HTML editor
- Brackets.io
Part 0: Getting a decent HTML editor
- Brackets.io
The Brackets.io software should be installed on all the Windows computers here at school that you can work on. Specifically, it should already be installed on the hallway/breakout computers, in the Open Learning Center, in the CC1-231 and CC1-210 computer labs, and in the VMWare Views.
Brackets.io uses Chrome to show you the web pages - if you haven't installed it yet then please head on over to https://www.google.com/chrome/browser/desktop/index.html and download and install Chrome. It's free, it's easy to use, and it's the 'standard' browser for this class.
If you're working at home (or on your own laptop) then you'll need to
download and install some software that will help you edit HTML files more
easily (and CSS files, and JavaScript files). We will be using Brackets.io
in this class, but you're free to use whatever you want. Brackets.io
works on Windows, MacOS, and Linux, and is available for free online at
http://brackets.io/.
You can use whichever version is current - don't worry if the instructor is using a different version than you (or if any screenshots in this course look different from what you're using).
(Note that downloading and installing may take a while - if you're doing these exercises in class make sure that you're following along with these exercises (on a school computer, or co-working on a friend's computer)while the software downloads and installs)
(Note that if you've taken BIT 112/113 previously and are planning on doing web design professionally that I'd recommend that you continue using Dreamweaver (or whtaever you used in 112/113) so that you can get more practice using that tool.)
Once you've installed your editor you should start it up. W3Schools actually has a good overview of the workflow that you'll use to edit web pages. Other than skimming through that tutorial there is nothing else that you have to do for this exercise.
Part 1: Adding HTML Tags
- Instructor Walkthrough
NOTE: Before starting it is HIGHLY RECOMMENDED that your create a BIT116 folder to save your work on a USB Thumb Drive, an External Portable Hard Drive, or your own personal Laptop or Notebook computer. After creating this folder, open it an create another folder called Lecture01. Your should save all your work in this BIT116 folder in sub-folders named after the current Lecture (e.g., Lecture01, Lecture02, Lecture03, and so on). You will also be storing your Assignments in this folder.
The instrutor will walk you through these first couple of exercises - you should watch what the instructor is doing and then do the following (after the instructor has demonstrated the work).
- Examine and download the 'starter file' for this exercise
- Click on the ICE FILE #1 link here to open it in a browser.
You'll notice that the only thing you see is the word 'Hiya!'. - Right-click on the blank browser page and select either View Page Source (Firefox, Chrome) or View Source (Internet Explorer). You'll see that there is very little code in this file. You're going to change that!
- Right-click on the ICE FILE #1 link here and save the file locally (using either Save Link As... or Save Target As...) to your BIT116 work folder (see note above).
- Click on the ICE FILE #1 link here to open it in a browser.
- Adding a couple of elements to the file using Brackets.io
- First, start the Brackets.io
program. You should see something that looks like this (although you
may not have anything in your left-hand panel:

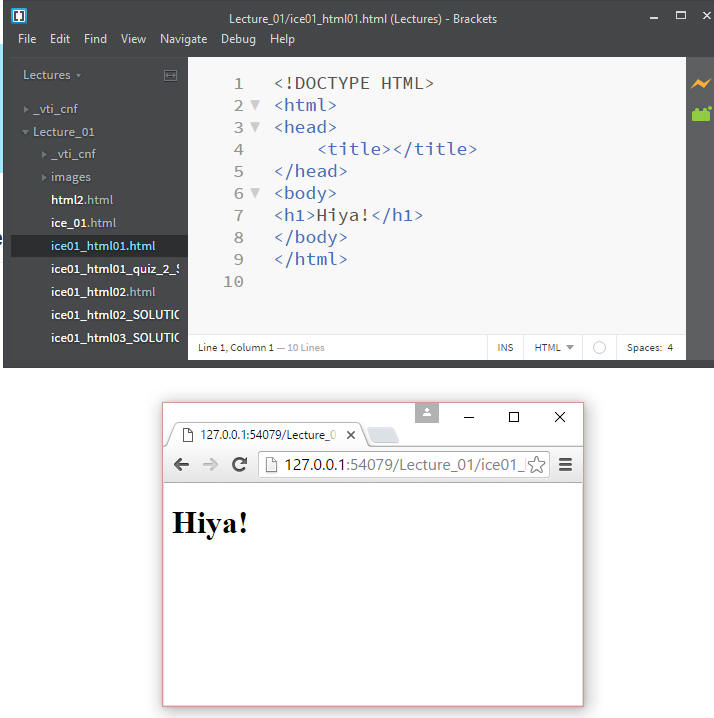
- Open the ice01_html01.html file using the File >> Open menu item in Brackets.io (or other text editor of your choice).
- Next, open that same file in a web browser of your choice (we'll
be using Chrome in this class).
You can do this by double-clicking on the .HTML file in Windows/Mac/Linux.
At this point, things should look more-or-less like this: - Once you've got the web page open in both Brackets and your web browser, make sure that you can see both the Brackets.io window and the Chrome window.
- In Brackets: try changing the word 'Hiya!' to something else (maybe 'Hello') AND THEN SAVE THE FILE
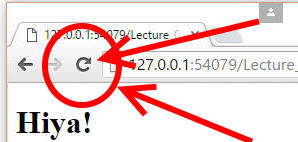
- In your web browser: Refresh /
Reload the page. You can do this by clicking on the
'reload' button, typically located right next to the address bar:
- On Windows, the 'F5' key typically does a 'soft
refresh (reload)', meaning that it will ask the web server if
the files have changed. Sometimes the server/browser can get
confused about what files have changed, and then fail to reload
the files even though they have, in fact, changed.
Holding down the Control key and pressing F5 (typically written as Control+F5, or Ctl+F5) will do a 'hard refresh', which will force the browser to reload all the files from the server no matter what. In general this is the better route to go, in order to ensure that you have the most recent copy in your browser.
tl;dr: Press Control+F5 to make sure that you've reloaded the web page.
- On Windows, the 'F5' key typically does a 'soft
refresh (reload)', meaning that it will ask the web server if
the files have changed. Sometimes the server/browser can get
confused about what files have changed, and then fail to reload
the files even though they have, in fact, changed.
- In this class you will modify your web pages (including the JavaScript parts of the web pages) by first editing the file in Brackets.io, then viewing the updated page in your web browser.
- In between the <title></title> tags, add Lecture 01 Ice 01.
- In the <body> add the following
elements:
- <h1>Heading 1</h1>
- <p>Paragraph</p>
- You'll notice in Brackets.io that it offers a popup menu feature that offers you various tag selections depending on what letters you started to type in. It will also
Auto-Complete your closing tags. In the long run, these features can save you a lot of time and work!
- Remember that the quizzes and exams are on
paper, only.
As you know, paper does not support the Auto-Complete feature (this is one of the reasons why the exams are given on paper - the instructor wants to know how much you know, not just how well you can use the software you've got).
Make sure that you can do this all on your own - definitely use the AutoComplete to help figure out things, to help you remember things, and to make your work go faster, but make sure to practice writing out stuff yourself, by hand, without the help of AutoComplete.
- Remember that the quizzes and exams are on
paper, only.
- Remember to Save your work in Brackets by clicking the File >> Save menu option, or by using the keyboard shortcut (Control+S on Windows), then hard refresh and the page in the web browser to see your work!
- First, start the Brackets.io
program. You should see something that looks like this (although you
may not have anything in your left-hand panel:
- One last warning
This first walkthrough covered the topic of 'How to
edit an HTML page using Brackets.io' in A LOT of detail.
Normally these
walkthroughs will NOT cover the material in this much detail.
Typically
the instructor will cover some of the material in class, and you will be
expected to experiment with stuff on your own in order to determine which
questions to ask so that you'll learn the material that you need to learn.
Part
1-A: Using the 'LivePreview' feature in Brackets
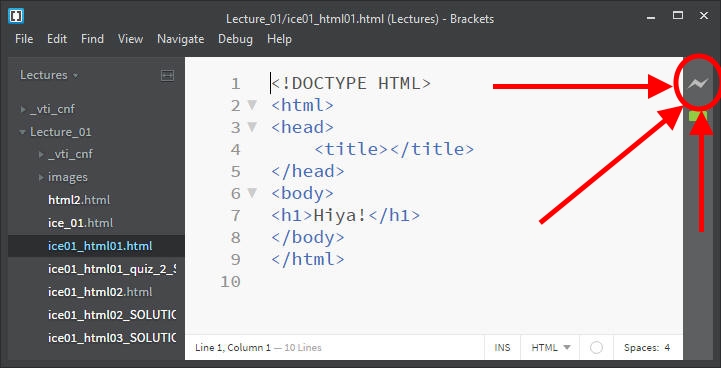
- The Brackets editor has this nice feature which shows you changes
in your web page immediately, as you're making changes to the source
code. This is called 'LivePreview'. In the image below you'll see three big, bright, red arrows
pointing at something that looks a little bit like a lightning bolt
(or the letter N, maybe). Click on that and Brackets will launch
the Chrome web browser and show you what your web page will
look like when it's rendered by a browser.
-
- You will need to install Chrome in order for this to work. Click here to download and install chrome: https://www.google.com/chrome/browser/desktop/index.html
-
- Once you click the 'Lightning Bolt' symbol you should see something like the
picture below. Specifically, you will see Brackets.io AND you
will see a Chrome web browser window.
Notice that the lightning arrow is now orange (which tells you that Brackets is doing it's Live Preview right now).
-
- Try changing the HTML in Brackets - change
'Hiya!' to be 'Hello!'
As you make the changes, you should see the web page in Chrome change at the same time.
This is nice because you don't need to go through the steps of saving the page in Brackets, switching the browser, and then reloading the page in the browser to see the changes.- If you can move Brackets to one side of your screen and the web browser to the other side then you can easily see both at the same time.
- It's great practice to take a moment and look at the HTML source code, look at the resulting page in the browser, and see how much you can figure out what part of the course code produces what part of the in-browser page.
- WARNING: Sometimes LivePreview doesn't work
right. It's not always clear what the problem is, and sometimes
you can Google for an answer and sometimes you can't.
tl;dr: Make sure that you can edit your web pages using the 'normal' save-in-Brackets, reload-in-the-browser workflow explained above.
Part
2: Recreate this (Completion) - H1, P
- Start this exercise by examining the the image below. Your
job will be to re-create that web page. In this version of the
exercise you will be given a starter file which contains some, but not
all, of the solution.

- Download and save a copy of the
ICE FILE #2
file.
If you don't remember how to do this off the top of your head then please review the prior exercise, then practice this step a couple of times (because we'll be using this technique a lot in this course). - Start by opening up the file, examining the contents of the file, and viewing that file in a web browser. Next, you should figure out what you need to change, add, or remove from that file in order to create a web page which looks like the image above.
- Finally, you can check your solution against the following instructor-provided solution: ice01_html02_SOLUTION.html
Part
3: Recreate this - H1, P
- Examine the the image below. Your job will be to (re)create
a web page that looks the same as the one pictured below.
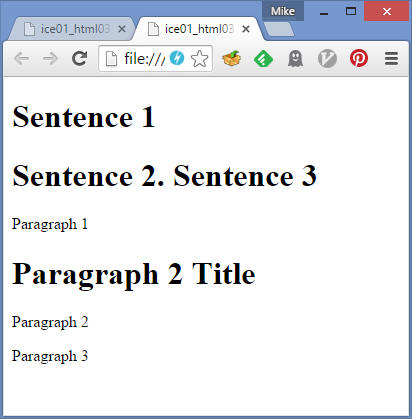
- Next, save a new copy of the
ICE FILE #1 file.
I recommend naming it something new (so that you can save your work from the prior part) and including "Part_3" in the name so that you can find it again later to study from, show that you've done the work for today, etc, etc). - Your job is to add, modify, and remove anything that you need to
so that the starter file (ICE FILE #1)
looks like the above image when you view the page in a web browser.
You'll notice that this starter file contains almost none of the above structure. It has the basic html tag, the head and the body defined, but everything else is up to you. - Make sure that you can do this from
memory by the start of the next class! While it's
tempting to look at the solution (in the next step) in order to get
the answer, and while it's possible to hack something together by just
looking up everything that you need please remember that next class
the teacher will assume that you can do this quickly and correctly in
order to cover the new material for the next class. In order to
do this quickly and correctly you NEED to have this stuff in your head
(and only look up a few things here and there, occassionally).
The way to get this into your head is to go home and practice this. Try doing this exercise 2 or 3 times in a row, at least twice a day, until the next lecture. - Once you've done your best to recreate the above image, check your work by examining the web page that was used to generate the image.
Part
4: Study Skills: Time Management: Draw up a realistic schedule for yourself
The goal for this exercise is to help you find enough time to succeed in your classes this quarter.
Background: During a recent quarter several students did not do as well as they (or I) hoped that they would. I asked them to think about why they weren’t doing so well, and to find three things they could to improve their performance in the future. The most significant factor that the students had in common was not dedicating enough time to this course. The purpose of this exercise is to help you find enough time to succeed in your classes this quarter now, at the start of the quarter, instead of later (when it’s harder to recover from early stumbles).
Before we start with the scheduling exercise I’d like you to stop for a moment and consider a couple of important points:
- There
are lot of lectures in this class; merely watching them isn’t enough.
Watching the teacher demonstrate something and then saying “Yeah, I totally agree with the expert’s explanation that I’m passively watching” is NOT real understanding. You understand it when you can (1) do it on your own, and (2) explain/justify everything you’re doing. So make sure to give yourself time to go back over each lecture's material. Give yourself time to think about the topics that were covered, and to experiment with the material in a small program (which you may need to make yourself) - Getting it right once isn’t enough; you
need to repeat the exercises till you really know how to do them.
When exam time rolls around you’re going to need to write a bunch of code quickly and confidently. Same thing with job interview time, or when you go on to the next course. It is very, very important that you budget time to repeatedly solve the exercises that you’re given, until you’re able to solve them quickly, confidently, correctly, and with a thorough knowledge of why everything work.
Let me be clear: Do these ICEs over and over again until you’ve really got it!- The first time one solves an In-Class Exercise it normally
takes a LONG time. This makes sense since you’re trying out
different approaches, getting stuck on minor things, and generally
puzzling things out. This is natural, and this is fine.
The second time you solve the same exercise it should go much faster – you know what approach you’ll use, and most of your mistakes are of the 'forgetting stuff' variety, not the 'conceptual misunderstanding' variety. Plus, if you get stuck you can look back at your first version and see what you did differently.
By the third time through you should be going much faster; the fourth and further repetitions should be very, very quick.
Each week budget some time to repeat the exercises that you did the previous weeks. - On the exam and in larger programs (and in job interviews) you’re going to want to have ‘templates’ that you can just whip out of your head so that you can focus on the specific problem you’re solving. Once we cover something that seems useful you should practice it until you can recreate it quickly. Some examples of code that you should be able to generate very quickly, confidently, and correctly include:
- Keep the above two points in mind as you find time in your schedule for this class. It’s not enough to find a way to ‘crawl across the finish line’ each week – you want to develop a solid understanding of the material to build a foundation for your future success.
- The first time one solves an In-Class Exercise it normally
takes a LONG time. This makes sense since you’re trying out
different approaches, getting stuck on minor things, and generally
puzzling things out. This is natural, and this is fine.
- Instructions
- Use this ‘Blank Schedule’
Word document. Start by downloading the document and filling it
out with your existing commitments.
The idea is that you want to end up with a schedule for a ‘typical week’, so that you can get an idea of how much time you have available for your classes.
If you don’t have a nice, orderly, repeating pattern for each week then make up a schedule that accounts for your existing obligations. If you think you’re going to work 20 hours each week (but don’t know which 20 hours) just pencil in 20 hours someplace so that you can make sure you’ve got enough space in the week (overall) for both work AND school.
In general, you should ‘round up’ your commitments. Notice that each row is 30 minutes of time. If your schedule doesn’t line up exactly then ‘round up’ the time that you’ll spend. For example, if your class gets out at 1:20 pm then assign the 1pm – 1:30pm time slot to your class and don’t try to jam some work into the 10 minutes between 1:20pm – 1:30pm. If you do get some work done then it’ll be a nice bonus, but all the other times you won’t be behind.
In general, you should ‘over-estimate’ your commitments. It’s very easy to forget and leave something out; it’s then very hard to find the time you need. If you don’t actually need all that time you can always do something with it later.
Again, the idea is that you want to end up with a schedule for a ‘typical week’ – the teacher isn’t going to verify your schedule, and it’s more important that this document be useful for you than the instructor, so if you’re unsure about what to do make a decision that helps you plan your time. - NOTE: You do NOT need to share anything with the instructor
unless you’re 100% comfortable sharing it. I do not want to
know the details of your personal life, I just want to know that
you’ve given some serious thought to how you’re going to devote
enough time to this class. For any given activity if you’re
not 100% comfortable telling me what you’re doing just write down
instead of any details. (You should remember for yourself what that time is used for, but the instructor does NOT need to know) - When scheduling your existing obligations don’t forget the
following, common consumers of your time:
- Sleep (+ bedtime and wake up time)
Block out at least 10 hours per day (1 for bedtime, 8 for sleep, 1 for morning routine) even if you’re not going to sleep that much - Work (INCLUDING COMMUTE TIME)
- Class time (INCLUDING COMMUTE TIME)
- Other obligations:
- Food – shopping, prep/cooking, eating, clean up afterwards
- Family - Kids
- Spouse (this should probably be in addition to your kids)
- Family – Taking care of your aging parents
- Spiritual (e.g., church, synagogue, mosque, etc, etc)
- Exercise
- Entertainment - TV shows, video games, etc
- “Me Time” – time to rest and rejuvenate each week.
- Sleep (+ bedtime and wake up time)
- Next, find 10-15 hours a week for your ‘baseline’ BIT 116
work. This is IN ADDITION to the time you’re spending in
class. This should include time to review what was covered
in class, time to study the topics covered on your own, time to do
the exercises, and time to practice exercises from previous weeks.
Spreading the time out over the week is better than doing it all at once. Not only can you can get stuck, but it’s hard to focus for hours at a time.
You can use different times for different things. For example, put some time right after lecture to tidy up your notes (more importantly, to tidy up your thoughts on the material), and put some before after dinner so you can practice what you've learned in the prior lecture. - Find an additional 5 hours a week for things are tough and you
need the extra time.
Hopefully you won’t need this every week, but it’s important to have the option available in case you need it.
Keep in mind that if you’re taking multiple classes reusing the same “extra 5 hours” for each of them will mean that in any given week you can only put in extra time on one class - Do repeat steps D and E for any other classes you might be taking
- Use this ‘Blank Schedule’
Word document. Start by downloading the document and filling it
out with your existing commitments.
IMPORTANT DISCLAIMER: While the instructor reserves the right to change the parameters of quizzes and exams at his/her discretion, you should assume that you will NOT be allowed to bring a cheat sheet/crib sheet into any quizzes, nor into the exams.