
CSS Effects Lab
Objectives
By the end of this lab, students will be able to...
- Use a Google font in your page formatting
- Use <img> tags and its attributes to add image elements to pages according to standard practices.
- Effectively use CSS to create a hover image effect on a web page.
- Describe several common image formats: JPEG (Joint Photographic Experts Group), GIF (Graphics Interchange Format), and PNG (Portable Networks Graphics).
Instructions
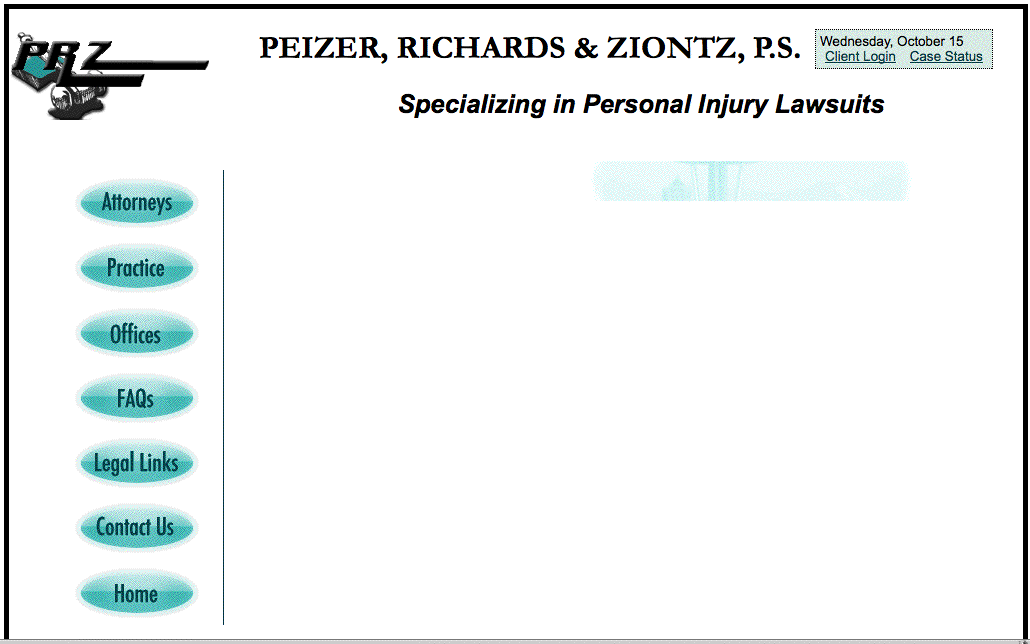
In this lab you will use CSS positioning and formatting to create a hover effect for the PRZ web site's main navigation. You will also work with images in three common web formats: GIF (.gif), JPEG (.jpg) and PNG (.png) format. If you haven't completed the CSS Positioning Lab, you can work from either a copy of the completed CSS Formatting Lab or an extract of the zipped files from that lab. Save the files to a new directory and work from there.
Begin work from where you left off with the CSS Positioning Lab.
Make a duplicate copy of the CSS Positioning lab directory and name this duplicate directory CSS_Effects. Save images and changes here.
Download Image Files
Download a set of optimized images, extract the images, and save them in your CSS_Effects/images directory.Modify the HTML template file to add a Google Font and a new style sheet
- From the new directory, open the template.html file in your HTML editor of choice.
- Add two new <link> tags to the <head>
-
<link href='http://fonts.googleapis.com/css?family=Didact+Gothic'
  rel='stylesheet' type='text/css'>
-
<link rel="stylesheet" href="styles/effects.css" />
-
- Update all of the HTML pages in the PRZ site.
- Use the font-family "Didact Gothic" for all links in the main navigation
font-family: 'Didact Gothic', sans-serif;
Modify the formatting and layout of the main navigation links
Format
- font-size to 1.2em
- font-weight to bold
- text-decoration to none
- color to #252550
- letter spacing to -1px
Layout
- width to 136px
- height to 65px
- text align to center
- vertical align to middle
- display to table-cell
Add a new style sheet called 'effects.css' with the hover effect styles
- Create a new CSS style sheet named effects.css and save it in the styles directory in the CSS_Effects directory.
- Edit the CSS file to add appropriate hover effects styles, applied to the main navigation section. Notice that you may repeat some of the same selectors used in the typography.css and/or layout.css file, but with different rules

- Apply the nav_background.gif as the background image to all of the <li> elements in the main navigation section.
- Set both padding and margin to zero for the <li> elements in main navigation
- Set the display:block and a width of 136px and a height of 65px to the <li> elements in main navigation
- When a user hovers over the main navigation list items (li:hover), set the background image to nav_background_flip.gif and position the item relative to its normal position, 5px to the right
- Save the CSS changes and View the HTML in a browser.
Add attorney photos to the attorneys.html page and float them right
- Edit the attorneys.html file to add four <img> elements at the beginning of each of the <li> elements in the Content section.
- For each <img> tag, set the src using the first name of the attorney and the extension .jpg as the file name,
and add an appropriate alt value (the alt value is displayed if the image cannot be)
<img src="images/alan.jpg" alt="Alan J. Peizer">
- Add an in-page style to the attorneys.html page to float:right all <img> elements within the #content
- Save the CSS changes and View the HTML in a browser. Notice what happens to the images as you resize the window.
- Try using some of the attorney images that use the .png format to get a transparency effect over the content background image. (only gif and png images are able to diplay some of their pixels as clear or transparent)

Upload the completed lab to your course portfolio
- Upload your completed Lab, and all the contents of its folder to your course portfolio site week 6 or labs section. Link it to the appropriate index.html page.
- Be sure your page is viewable at http://studentfolders.student.cascadia.edu/bit112/