Note: Please keep the programs that you create today, in case you have a question about your grades for the ICEs at the end of the quarter. When you're working with a partner, each person should save their own, individual copy.
 Part
1: Adding Bootstrap To An Existing Page
Part
1: Adding Bootstrap To An Existing Page
- Visit http://www.w3schools.com/bootstrap/bootstrap_get_started.asp and figure out what you need to do in order to add Bootstrap support to your page.
- Start by going to the bottom of the page and trying out the 'Try It' buttons. This way you can see how things are supposed to look, and you can play around with it a bit.
- Of course, we can't just play around with Bootstrap - we want to
add it to our own files, so that our web pages look nice and are easy
to use.
Download a this starter page and look it over BEFORE you add Bootstrap to it: AddBootstrap.html.
Note: this page does not contain any Bootstrap (yet).
It's appearance will change after you add Bootstrap, so make sure you're paying close attention to how it looks. (You might even try opening it twice, adding Bootstrap, and then only refreshing/reloading one of the two browser windows, so you can easily see a 'before and after view' of the change) - Next,
To be clear: there's going to be a total of 4 steps.
The unlisted "step 0" is that you should add the stuff listed under "Bootstrap CDN" - this is how you tell the web browser where/how to get Bootstrap. After you've done that then there's three clearly numbered steps that you need to do. - Except for what's listed in those 4 steps you don't need to change anything else on your web page itself.
- You'll know that you've done this correctly when the web page's
appearance suddenly changes. In particular, watch for when the
font changes to a sans-serif font
(such as Arial - this text is written in a sans-serif font)
instead of a serif font (such as Times New Roman - this text is written in a serif font).
Part
2: Bootstrap: Using a Bootstrap-specific selector
- Next, add a Bootstrap-specific class selector or two to your page.
- It's recommend that you start by going to
http://www.w3schools.com/bootstrap/bootstrap_typography.asp,
scroll down to "Contextual Colors and Backgrounds", and then apply one
of those to something on your page. You might try by starting
with
.text-danger. Once you've done that feel free to browse through the
rest of the W3Schools pages and find other interesting Bootstrap
classes to try.
- HINT: You can quickly find text-danger by holding down the
Control key and then pressing the 'F' key (this is normally
written as Ctrl+F), and then typing in the words
you want to find on the page In this case, type in:
text-danger - Just like the previous exercise, start by playing around with the 'Try It Yourself' feature, then move this over into your own web page(s).
- HINT: You can quickly find text-danger by holding down the
Control key and then pressing the 'F' key (this is normally
written as Ctrl+F), and then typing in the words
you want to find on the page In this case, type in:
Part
3: Adding a Bootstrap-specific widget to your page
- Before I describe what you're supposed to do for this exericse I want to define a term that's used in computing: widget. The term 'widget' is sometimes used to mean "something you see on the screen". For example, a button that you can click is a widget. A menubar is another widget, and each indvidual menu item are also separate widgets. (We think of the menubar as being it's own widget because it does one thing - show and hide various menus of menu items. Each menu item is it's own widget because each one does something different than the overall menu (each one triggers a specific action).
- For this exercise you should find a widget that Bootstrap provides
and add it to your page. You're welcome to use whatever widget
that you'd like to, but here's a list of a couple of specific ones if
you're looking for some guidance:
- Bootstrap Jumbotron
- Bootstrap's Own Icons
- Bootstrap Panels
-
Bootstrap images
Make sure to try out a couple of different shapes and to try out the 'responsive' feature, which resizes images auto-magically. - Bootstrap's automatically adjusting grid system
Part
4: Identify CSS, HTML and JavaScript in a file
- For each of the following files, open the file in a browser and then right-click on the browser page and select either View Page Source (Firefox, Chrome) or View Source (Internet Explorer).
Go through and clearly identify which regions of the file are CSS (and
therefore obey the syntax rule of CSS) and which regions of the file are
HTML (and therefore obey the syntax rules of HTML), and which regions are
JavaScript.
Please refer to the exercise in the prior lecture on this in order to remind yourself how to identify HTML & CSS regions, and how to print out / copy to Word / etc the source for writing on. - Because this is a very important, but fairly 'rote' skill, here are
some instructions that should get you started on identifying the
JavaScript regions:
- To identify the inline JavaScript, go through the page an look for the 'onClick' attribute for things like <INPUT> elements of type "button", as well as anchors ( <a> tags ) with javascript in the href attribute
- To identify the internal JavaScript look for <script> elements
that have no 'src' attribute, but do have code between them.
The region between the <script> tag and the
</script> tag is
written in JavaScript.
- Remember that you can commonly find internal and inline regions that are intended to work together. It's very common to define JavaScript functions in an internal/external JavaScript region that is called by an inline event handler (such as onClick)
- To identify the external JavaScript look for <script> elements that do have a 'src' attribute, and have no code between them. The file refered to in the src attribute is written entirely in JavaScript.
- File for this exercise:
Part 5: Using the alert() Window to Display a Message
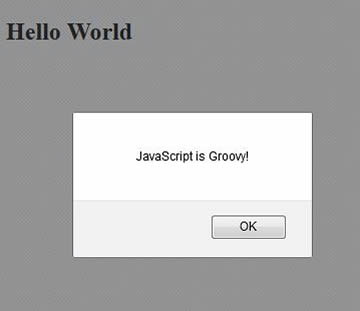
- Start by creating a new HTML file for this exercise. (Re)Name it ice04_02.html. If you don't already have one, create an <h2> heading tag and give it some text (e.g., Hello World).
- Next, add some JavaScript to the page so that you
can alert the user to a message of your choosing (choose any message
you want, but keep it clean) when the page first loads.
Make sure that you can use the <script></script>tag pair correctly. Use the alert())function inside of the <script></script>>tag pair to bring up an alert window that displays a unique message (e.g., ""JavaScript is Groovy!!") when the page is opened in a web browser. Mix things up, if you'd like. Try putting the script element into the body of page, and into the head of the page.of the page.
When you've finished your page might look something like this::
Part
6: Using a Separate JavaScript file to Store Your JavaScriptPart
3: Using a Separate JavaScript file to Store Your JavaScript
Start by creating another new HTML file for this exercise. Name/rename it ice04_03.html.
For this exercise you should have your page again alert the user to a message of your choosing, but this time place the JavaScript code in a separate .js file.
You'll notice that this exercise closely replicates one of the demonstration files that has been provided to you. It's worth noting that as we cover material in class you're expected to know it in the future (that is, know it mostly from memory). Therefore you should strive to do as much of this exercise from memory as possible in order to build up your skill at this.
A good way to do this is to do this from memory as much as possible but 'fall back' onto the example when you get stuck. An excellent approach (one that you might pursue outside of class) would be to repeatedly do this, over and over, until you're able to confidently redo the entire exercise from memory, quickly, confidently, and correctly.