Eruption Plumes of Io
Extraterrestrial
volcanism and imagery analysis
|
|
Welcome to Io
Astronomers use imagery as a fundamental tool
for observing the
Universe.
All modern telescopes and spacecraft are equipped with
instrumentation which collects stores and
transmits imagery in digital
form.
This digital imagery can then be enhanced to aid astronomers
in observing specific phenomena. Upon successful completion of this lab,
students will achieved the following
outcomes:
- Learn the fundamental physical nature of the Galilean moon Io
through active manipulation of imagery;
- Learn the power and flexibility of digital imagery analysis
- Critically analyze imagery in order to infer the nature of
volcanism on Io
- Integrate mathematics into imagery analysis in order to extract
additional insights
- Communicate and interact with group members in order to reach a
maximum variety of perspectives and potential solutions
Begin
You and your group will need a computer
workstation with both the software package Image J and the associated Io
images loaded. Your instructor will
assist you.
a Open the Io image. Do this by going to File and selecting Open. DOUBLE-CLICKING ON THE IMAGE WILL OPEN
DIFFERENT SOFTWARE. DON’T DO THIS.
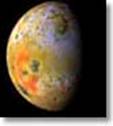
Io is the
innermost Galilean satellite of Jupiter. It is slightly larger than
Earth’s
Moon. The densities of the Moon and Io are nearly the same,
indicating
that they are both made of rocky material. However, the Moon
is
geologically “dead”, while Io is the most volcanically active body in the
Solar
System.
Io is
caught in a gravitational tug-of-war between Jupiter and its other
moons. As
Io orbits Jupiter, its distance from the planet changes. Io is
flexed
(stretched) in different directions by the changing tidal forces.
The
friction created by this flexing produces enough heat to keep parts
of Io’s
interior molten.
At first,
the Voyager scientists processed images of Io to bring out
surface
detail. They were delighted to discover volcanic cones and flows.
These
signs of recent volcanic activity made headlines around the world.
1.
Describe any evidence of active volcanism you see on the surface.
a Open the Prometheus image.
One of the
images showed a large, unexpected bubble-like feature above
Io’s
surface. Further examination revealed that the cameras had caught
a volcano
in the act of erupting. In all, scientists discovered nine active
volcanoes
on Io. In this activity, you’ll measure and study these plumes.
a Adjust the
brightness and the contrast of the image to show the surface
features
as clearly as possible.
a Experiment
with different color tables to see which one best shows
the
structure of the plume. Experiment with other
features of the software. See what it can do.
Based on
the camera’s distance from Io, scientists know that the width
of each
pixel in the image represents a distance of 4.16 km. This scale has
been set
for you.
a Use the line tool combined
with analyze/measure to measure
the maximum height of the plume (named Prometheus). Magnifying the plume using the
magnification tool will
make it easier to measure.
2. Record
the height you measured for Prometheus.
3. Use the
plume height you measured to calculate the ejection velocity of the
material
that forms Prometheus. (Remember to convert to meters!)
The
equation for ejection velocity is:
![]()
Where
v = ejection velocity in m/sec
g
= surface gravity in m/sec2
h = plume height in m
The average surface gravity for Io is 1.79 m/sec2
4. Prometheus
is actually 5°
in
front of Io’s limb instead of right on the
edge.
Would the actual height of the plume be greater than or less
than your
measured height? Why?
5. The
true height of Prometheus, corrected for limb geometry, is 77 km.
Calculate
the ejection velocity again, using the actual height.
6.
Commercial jets fly at about 500 miles per hour. Compare this value to the
ejection
velocity of the plume material. (Convert units as necessary. 1 mile = 1.585 km.)
Pele
a Open the
Pele image.
This image
of Io was taken through an ultraviolet filter. It shows Pele, the
largest
volcanic plume observed on Io.
a Enhance
the image to discover the plume for yourself. Experiment with the
contrast
and/or color tables to get the best view of the entire plume.
7. The
scale of this image has been set to 7.5 km/pixel. Measure the height of
Pele and
determine the ejection velocity of the volcanic material for this
plume.
8. Measure
the width of the plume and calculate the total area covered by the
fallout
from the plume (assume the plume fallout is circular in shape).
The area
of a circle = πR2
Loki
a Open Loki 1. This is
another eruption area, viewed from above.
a Adjust the
brightness and contrast for the clearest view of the area.
Loki is
the site of a fissure eruption on Io. It is a long, straight eruption
vent with
plumes at each end. The fan-shaped, hazy, dark material on the
left end
of the fissure is Plume 2. Plume 9 is the smaller, less obvious
dark area
at the right end. Below the fissure, the dark horseshoe-shaped
feature is
possibly a lake of molten sulfur with solid “sulfurbergs”
floating
in it.
a Open Loki 2 and Loki 3.
These
images show Loki’s plumes from another angle, above Io’s limb.
Voyager 1
took Loki 2 in March
1979. Loki 3
was
taken about 4 months
later by
Voyager 2. The viewing angle and scale are not the same
for each
image.
a Scale and
rotate the images to the same size and orientation so that you can
compare
them more easily.
a Adjust the
brightness and contrast of both images to view and compare the
plumes,
seen above Io’s limb.
9.
Describe any changes in the size of each plume between the two Voyager
encounters.
10. Do you
think these changes are due to differences in ejection velocity or
changes in
the amount
of material erupted? Why?
Conclusions
Write a 2-3 paragraph conclusion detailing
what was learned about Io through the image processing techniques, being
certain to explain how those techniques assisted in analysis of the images.